The MToolBox-snakemake workflows
Contents
MToolBox-snakemake includes several workflows, written in snakemake and conveniently embedded in wrappers. Using these wrappers will save a lot of typing and headache for the lazy users (probably you). Cool, isn’t it? :)
All the wrappers accepts snakemake arguments and parse automatically the config.yaml configuration file required by snakemake.
You can find a list of the available workflows at the end of this page.
An overview
The MToolBox-snakemake main workflow is MToolBox-variant-calling. The configuration of this workflow is shared with all the other MToolBox-snakemake workflows and it is reported in this section.
You are going to analyse one or more samples, represented by one or more read datasets (ie, libraries). For this purpose, you are going to provide a reference mitochondrial genome. Choose it carefully, as your final results will be based on it! You also have to pick a reference nuclear genome that will be used as reference to filter out ambiguous reads.
If you are interested in performing functional annotation of mt variants, you will also explicitly provide species.
Now you’ll be wondering: how do I tell all these things to the pipeline? In the following sections, we’ll see how to do that through a handful of configuration files!
Setting up a working directory
Note
Replace /path/to/MToolBox/dir/ with the MToolBox-snakemake installation path and /path/to/analysis/dir with the folder where you wish to run your analysis.
export MTOOLBOX_DIR=/path/to/MToolBox/dir/

cd /path/to/analysis/dir

# create folders needed by the workflow
mkdir -p data/reads
mkdir -p data/genomes
mkdir -p logs/cluster_jobs

# copy configuration files you will edit later
cp $MTOOLBOX_DIR/config.yaml .
cp $MTOOLBOX_DIR/cluster.yaml .
cp $MTOOLBOX_DIR/data/*.tab data
At this point, if you run the command tree the structure of your directory should look like
.
├── cluster.yaml
├── config.yaml
├── data
│   ├── analysis.tab
│   ├── datasets.tab
│   ├── genomes
│   ├── reads
│   └── reference_genomes.tab
└── logs
    └── cluster_jobs
Compiling configuration files
An MToolBox-snakemake workflow run is managed with these configuration files:
- data/analysis.tab
- data/reference_genomes.tab
- data/datasets.tab
- config.yaml
- cluster.yaml
Sounds a pain, huh? The good news is that they will help you in setting up and keeping track of your analyses very efficiently. Plus, the config.yaml and cluster.yaml files should work the way they are, with little to no edit needed. Please read the “Notes on configuration files” at the end of this section.
Let’s see how to compile the configuration files in detail.
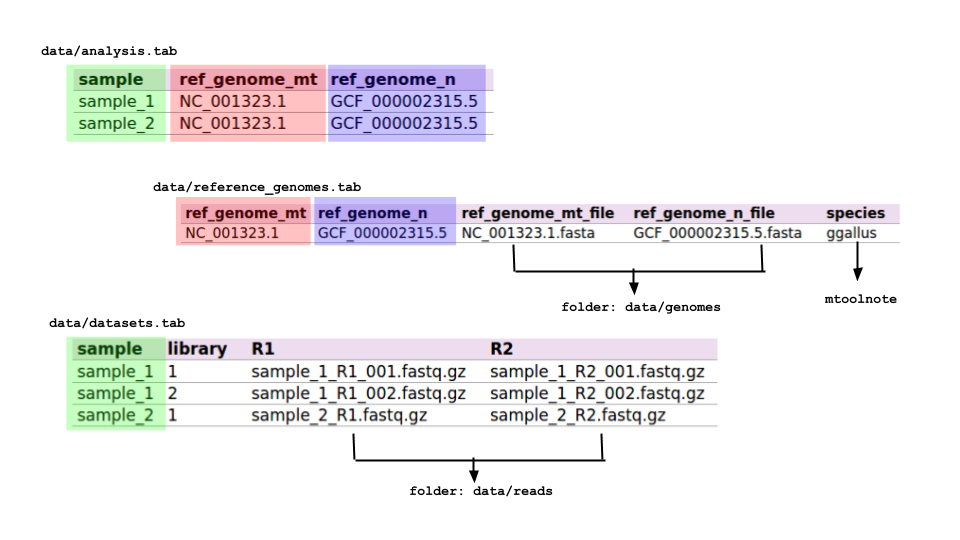
- data/analysis.tab
For each sample you are going to analyse, in this table you provide info about which mitochondrial and nuclear reference genomes to use. Example:
| sample | ref_genome_mt | ref_genome_n |
|---|---|---|
| sample_1 | NC_001323.1 | GCF_000002315.5 |
| sample_2 | NC_001323.1 | GCF_000002315.5 |
In this example, the first row specifies that variant calling will be performed on sample_1 using the mitochondrial reference genome NC_001323.1, by discarding those reads aligning on the nuclear reference genome GCF_000002315.5. Please note that the names used in this table will be used in the workflow execution and are case-sensitive. Actual files related to samples and reference genomes will be provided in the data/reference_genomes.tab and in the data/datasets.tab files.
- data/reference_genomes.tab
Structure (strictly tab-separated):
| ref_genome_mt | ref_genome_n | ref_genome_mt_file | ref_genome_n_file | species |
|---|---|---|---|---|
| NC_001323.1 | GCF_000002315.5 | NC_001323.1.fasta | GCF_000002315.5.fasta | ggallus |
This table contains explicit names for reference genome files used in the workflow. Names in the columns ref_genome_mt and ref_genome_n must be consistent with the ones in the same columns in the data/analysis.tab table. Genome files must be located in the data/genomes folder.
The name in the column species should be one of the species available in mtoolnote for variant functional annotation.
- data/datasets.tab
Fill this table with as many read (paired) datasets are available per sample. Each read dataset will be processed independently and merged with the others from the same sample before the variant calling stage. Read dataset files must be located in the data/reads folder.
Example:
| sample | library | R1 | R2 |
|---|---|---|---|
| sample_1 | 1 | sample_1_R1_001.fastq.gz | sample_1_R2_001.fastq.gz |
| sample_1 | 2 | sample_1_R1_002.fastq.gz | sample_1_R2_002.fastq.gz |
| sample_2 | 1 | sample_2_R1.fastq.gz | sample_2_R2.fastq.gz |
In this case, sample_1 is represented by two PE libraries, while sample_2 is represented by one.
- config.yaml
This file contains basic configuration for the whole workflow. Default configuration should fit most cases; you might want to check the following options:
- mark_duplicates: remove duplicate alignments with Picard MarkDuplicates. Default is False.
- keep_orphans: the first alignment round might leave some reads “orphan”, i.e. their mate has been discarded. This can happen for two reasons: 1) the discarded read has so many sequencing errors it couldn’t be properly mapped or 2) the discarded read maps only on the nuclear genome: this could mean that the whole read pair represents a nuclear region overlapping a NumtS (nuclear sequences of mitochondrial origin). Either case, you might want to discard these “orphan reads” since they could represent a source of error/noise for downstream analyses. Default is to keep them (True).
- trimBam: read aligners sometime struggle to properly align reads at their ends when they contain an indel or when they encompass low-complexity regions or homopolymeric stretches. Despite all the post-processing efforts we could implement (e.g. read re-alignment around indels), misalignments could still make it to the variant calling step and introduce noise (e.g. variants with very low heteroplasmy fraction which eat into the HF of a properly called variant). To prevent this, you can choose to “mask” (soft-clip) 10 nucleotides at each alignment end. Default is True (mask the alignment ends). Please note that, at the moment, the number of nts you can mask at each end (10) cannot be modified.
- cluster.yaml
If you are analysing huge datasets, it would be a good idea to run MToolBox-snakemake on a computing cluster. The file cluster.yaml contains settings for this scenario, which should work well as they are.
How to run the MToolBox wrappers
Running the wrappers is as simple as this:
MToolBox-<wrapper> <snakemake arguments>
The MToolBox wrapper scripts embed snakemake workflows, which allow an efficient and powerful management of all steps required to get the desired output files. In other words, with (roughly) the same command, you can run a full analysis, resume it or check its status. This is extremely useful in many settings, e.g. when you are running MToolBox-snakemake on a lot of samples.
Graphical representation of the workflow
Before running the workflow, it’s good practice to check if the provided setup is correct. You can run
MToolBox-variant-calling -nrp
to execute a dry run (i.e. simulate to run the workflow) and get a list of the files that will be created and the commands that will be run.
A graphical - and probably more user-friendly - representation of the workflow can be obtained by running
MToolBox-variant-calling --dag | dot -Tsvg > my_workflow.svg
The graph in file my_workflow.svg will report all the workflow steps (for each sample in the analysis.tab configuration file). Steps in dashed lines are to be run (because their outputs are not present), whereas outputs for steps in solid lines are already present. A graphical representation of the workflow as per the analysis.tab file in this repo is reported as follows.
TODO: insert image.
Ok, gotcha! How do I actually run the workflow then?
MToolBox-variant-calling -pk -j 8
This will run the MToolBox-variant-calling wrapper, printing the commands that get executed and using at most 8 cores at the same time (i.e. allowing to run multiple commands at the same time with no excessive risk of blowing up your machine).
Running on a computing cluster
If you wish to run a MToolBox-snakemake workflow on a huge number of samples and/or your datasets are of a considerable size, you might want to run the workflow on a computing cluster. In this case, you should instruct the job scheduler you’re using on how to do it. with the --cluster option. You might also want to run the process in background and redirect the standard error and output (i.e. all the messages printed on the screen) to a log file:
MToolBox-variant-calling \
-rpk \
-j 100 \
--cluster cluster.yaml \
--cluster 'sbatch -A snic2018-8-310 -p core -n {cluster.threads} -t {cluster.time} -o {cluster.stdout}' &> logs/mtoolbox_run.log &